Preparation.
Inspiration after reading carefully through the brief i had a good idea of what i wanted to create. Every since getting into 3d i have had an idea in my head of this model and the competition was the perfect way of getting it out.
After reading through the brief i spent 2 days drawing out very rough sketches on paper and using this, began to build proxy geometry in 3ds max.
For people like myself with very little concept skills its a great way of quickly analysing shape and form.
Functionality.
I was very critical of myself the entire project of this phase. It was something i knew i would have to nail as there was the possibility of it becoming an animation tutorial and a key element in the judging process.
In the image to the left i have created the hero joints and limbs figuring out the best angles for support and manoeverability. It was something i had little experience in but it felt like a great achievement when i saw my design worked. After figuring out the joint system i then began focusing on curves and sihlouette. I am a fan of curvy sports cars and sci-fi design so this was the most fun part of the competition, designing around the shell i had created.
Inspiration.
My biggest inspiration was war of the worlds, i have read the book 2 times and seen the film for the artistic design of the aliens alone countless times. The reveal scene in this film is very harsh and i could definitely see a correlation between it and the competition brief.
Knowing one of the judges, Giovani Napkill single handely modeled the tripods and that i would have a chance of winning a video critique with him was huge for me and really got my motivated. Other inspirations where Transformers, iron man and aliens.
Design.
I Had never designed something this large before and i will admit, i heavily underestimated how challenging it would be. It was a time consuming process as one moment i would be very happy and begin moving on, then i would go back and completely redo it when it wasn’t working later on. I wasted alot of time doing this, but got used to it very fast.
Part of the redesign process really payed off though at first it is depressing hitting the delete key but i was making steady progress forward so this was enough to keep going.
I paid close to attention to the curve flow between each piece and tried to create an even base of hard and curvy surfaces. There was some cars like the Ferrari Enzo and Koenigsegg that really helped me understand this.
The Head was the hardest part to complete and i scrapped 2 fully modeled designs before continuing. The idea was to have it break away into two segments revealing the rocket launchers in battle and protecting them when reloading. On top of this the design also needed to incorporate large stabilising counter weights as the mech was so high off the ground it could easily become off balance.
My idea of utilising jet engine technology to force and stabilise the head can be seen in the below image. Along with the two stabilising engines is a main thruster for short propelled jumps and surprise attacks over buildings or obstacles.
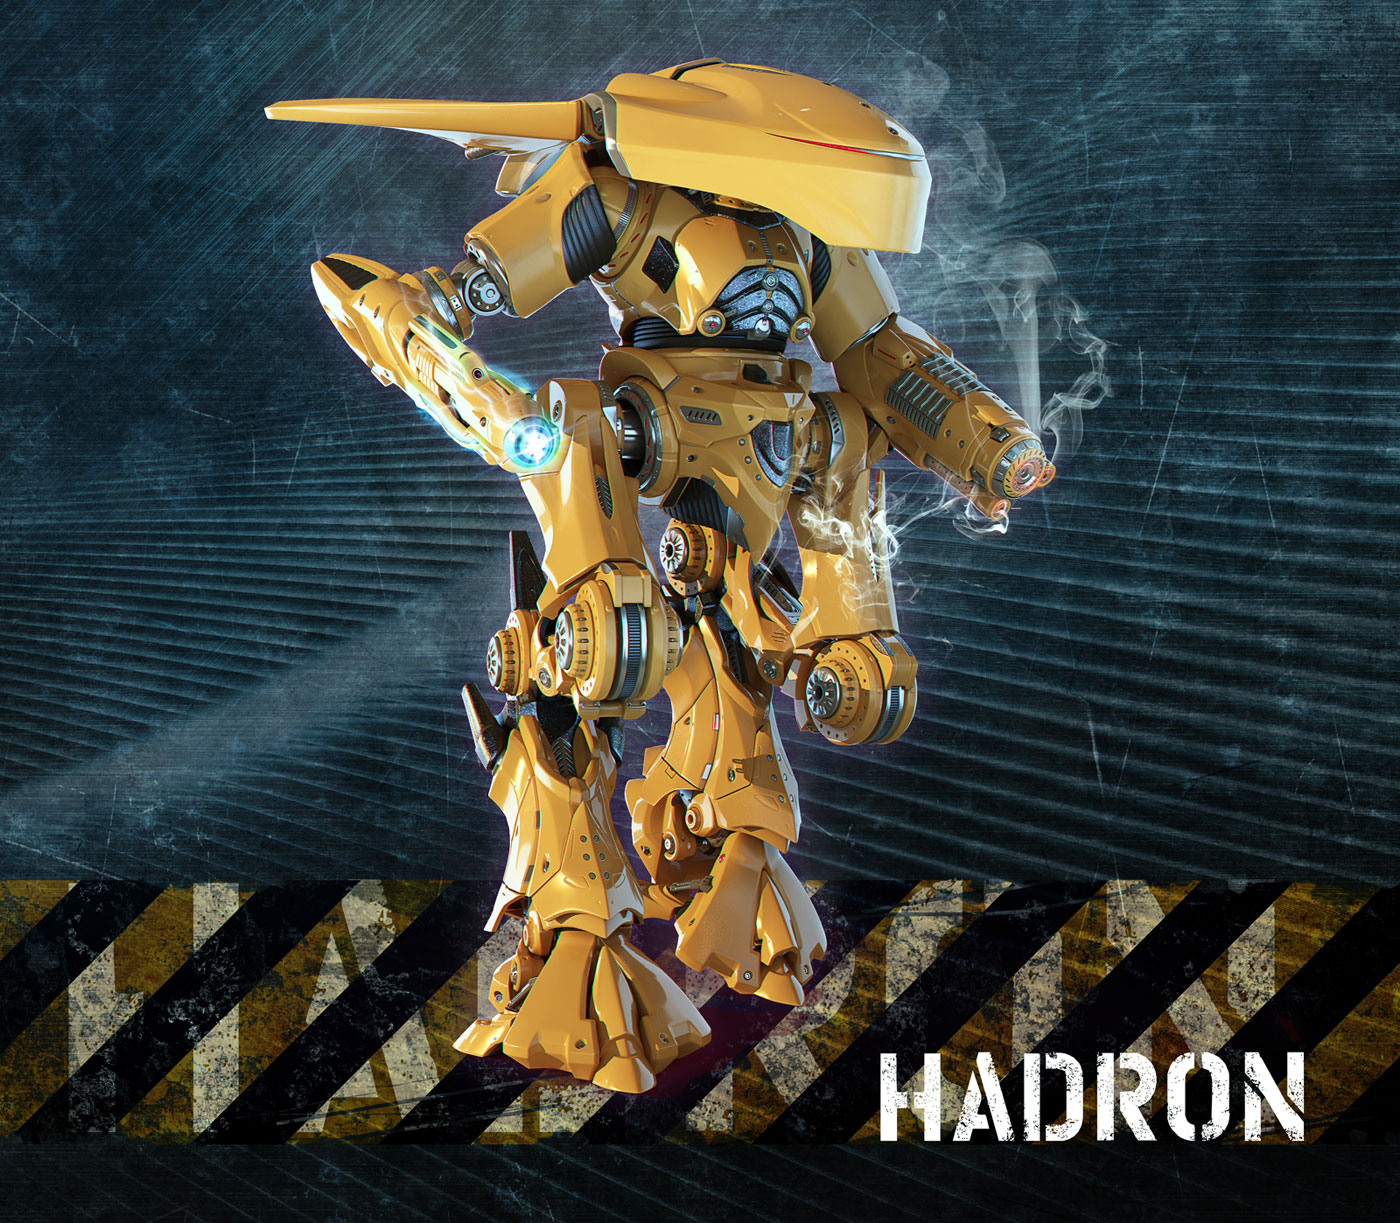
Weapon Design.
If you have seen my folio you will know i like modeling guns so this part i felt right at home and got through it relatively quickly. Hadrons right arm is a thermo-electric railgun that discharges a large electrical beam deadly too enemy equipment and lethal to living things.
The Right arm is a multi purpose weapon more suited for short range offense. It has a large degree of movement and contains a ion cannon and two smaller, silenced chainguns for removing soldiers and small vehicles.
Hadrons last remaining attack weapon is 6 surface to air/land cruise missiles mounted under the tightly armored back frame. I had to very carefully plan this part. getting the rockets to fit was difficult and the case of the final head rework.
Neck.
The Neck did not need a huge amount of freedom to move due to the swiveling hips however i incorprated some basic movement and support so it could make small adjustments seen in the image below.
Topology.
For the detail i wanted to ad i knew i could not keep the topology perfectly clean, i did my best though optimising where i could, below are some screen-grabs of hadrons wireframe.
Lighting/Shaders.
Due to time constraints i had very little time to create the lighting and shadier setup. I use vray as my renderer of choice. the setup was very simple. a single vray light and a vray sun light to create the hotspot reflections. i also had a vray hdr in the reflection and illumintion slots which i got from www.hdrimaps.com
For Vray settings i used Irradiance map and light cache with fairly default settings. There was nothing special about the raw render. I composited the file in photoshop, adding glow effects, retouching, bad reflections and things like that. The background, and smoke are 2D effects which a friend of mine helped me with afterwards. (thanks man)
Modeling Technique.
For personal projects i have always used 3ds max, out of the box it has what i feel the best core modeling toolset and i have never needed to install a plugin or adon to get more out of it. I have my Hotkeys setup as the following. The tools i most commonly use is Shift+extrude Cut, bridge, target weld and connect. I have a very simple workflow that involves alot of repetition of these tools.
I recently created 3 fundamentals videos which i explain how i use all these tools which you can find on the digital apprentice website.
My Background:
I have my Hotkeys setup as the following.For personal projects i have always used 3ds max, out of the box it has what i feel the best core modeling toolset and i have never needed to install a plugin or adon to get more out of it. The tools i most commonly use is Shift+extrude Cut, bridge, target weld and connect. I have a very simple work-flow that involves
alot of repetition of these tools. i recently created 3 fundamentals videos which i explain how i use all these tools which you can find on the digital apprentice website.
I grew up in Sydney, Australia where i currently work as a freelance modeler/3d artist. I started learning 3D almost 6 years ago with bryce, before moving to 3ds max 6. After practising for 2 years i got a job at fuel international www.fuelvfx.com as a modeler.
I worked on feature film and TVC’s for over 2 and a half years and am now preparing to start a company with 2 work colleagues. You can view my website at www.grantwarwick.com or
sathe.cgsociety.com/gallery
Thanks.
I Would like to say thanks to digital apprentice and all the other entrants at digitall apprentice forums for providing me alot of great feedback and critique over the competition period. I Really appreciate it.
I would strongly encourage everyone to check out this site, it has a ton of great learning material from the best in the industry and is an inspiring place to be. Also id like to thank my friends who gave alot of support on the project, it was a long task and there was times when i felt like giving up so they got me over the line.
Thanks guys!
Grant.
| Please leave you comments for anything related to this tutorial. Also make sure you Subscribe to our Feed or Follow us on Twitter to stay updated to the lattes tutorials, news and interviews in the graphic community. |
ALSO CHECK OUT THIS COOL TUTS!
View Comments (19)
Nice tut.but i need a fully explained tut to make hadron.
Is the video tut available?
XD very very very good modeling and effects but i'd like u to tell step by step the modeling ... i know its long but i need to aquire some new skillz
amAzing
which softwAre useD?
TURKIYE
Wow...!!
from Dublin, Ireland
Great!
Tutorials like this are always a source of my inspiration!
Thank You!
Awesome tutorial, great job.
Thanks From Pakistan
Excellent tut !!SWEET! My brain is now overloaded with ideas from some of the material in this.
Keep em comming! I will be waiting for more!
Love the tutorial, great work, also looking froward 4 the interview that i heard on twitter.
from Malta, Europe
Nice one!
you have the right touch for detail
Great Tut, Grant!
Thanks a lot!
Argentina.
omg i love this this is great you rock man
nice man..
Very, very cool.mate :=)
Awesome man thanks.
very inspiring.
i would say he has done an awesome work, the result is spectacular
Hi guys!
I first like to thank you 4 giving us very helpfully tutorials and interviews...i really like TB...and i have recommended to all my school friends.. and Grant i have on word for you...FREAKING AWESOME MAN!
wow i really like the design of the character...it reminders me somehow of the robot from Terminator and RoboCop movies.
gr8! i e really enjoyed reading this workflow tutorial...